Understanding community response to Warburton MTB project
The Mountain bike park planned for Warburton has been extremely controversial with social and environmental concerns regularly voiced by critics. An Environm...

Triangular meshes can be used for representing surfaces in 3D, can be used for interpolation and other modelling.
You can extract a triangular mesh using marching cubes over a volume of interest or build the mesh to fit a specific geometry.
However, in some cases a complicated mesh is not required.
In my case, I am trying to add a surface into LoopStructural which represents the elevation.
The elevation data has been resampled from a raster image, so there can only be a single elevation value for each pixel.
There are a few ways I can add the surface for visualisation:
To keep the process simple and as efficient as possible I will use the second approach and will do this using numpy arrays. This approach divides a square into two triangles as below.
To apply this to a cartesian grid we need a way of indexing the grid elements and determining which vertices are corners for which cells.
We can define two indexing systems:
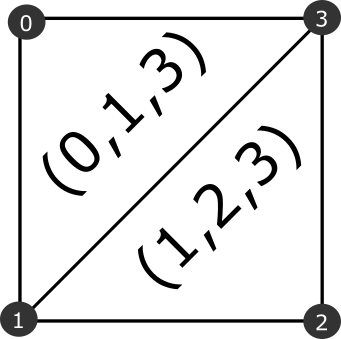
Each cell has four corners, the origin of the cell (node 0 in the above diagram) is the vertex where i=ci, j=cj. The other cells can be defined as (i=ci+1, j=cj), (i=ci+1,j=cj+1) and (i=ci, j=cj+1).
We can apply this to every cell in the grid to get the corner indices. This short snippet of code shows how to do this in python using numpy.
import numpy as np
# define the vertices
origin=[0,0]
maximum=[1,1]
nsteps = [10,10]
x = np.linspace(origin[0], maximum[0], nsteps[0])  #
y = np.linspace(origin[1], maximum[1], nsteps[1])  #
xx, yy = np.meshgrid(x, y, indexing='xy')

# define the cell indexes
ci = np.arange(0, nsteps[0] - 1)
cj = np.arange(0, nsteps[1] - 1)
cii, cjj = np.meshgrid(ci, cj, indexing='ij')

corners = np.array([[0, 1, 0, 1], [0, 0, 1, 1]])

i = cii[:, :, None] + corners[None, None, 0, :, ]
j = cjj[:, :, None] + corners[None, None, 1, :, ]
i and j are 9x9x4 arrays showing the node corner indices for every cell in the model.
For convenience we will convert from i,j indexing for the vertices to a global index. This can be calculated as i+j*nstep[0]. We can then convert the vertices to a Nx2 array of points.
# reshape the array so that its Nx4, either use -1 so
# numpy guesses the shape or define as i.shape[0]*i.shape[1]
gi_corners = (i+j*nstep[0]).reshape(-1,4)
# flatten xx, yy and then stack vertically, then rotate
vertices = np.vstack([xx.flatten(),yy.flatten()]).T
We now have an array that has the corner indexes for every cell and another array containing the location of the vertices. To extract a triangular mesh from this we need to generate an array of triangle indices. Using the relationships shown in the diagram above the triangle indices are tri1 = [0,1,3] and tri2 = [1,2,3]. We can use numpy slicing to extract the two triangles from this grid.
tri1 = gi_corners[:,[0,1,3]]
tri2 = gi_corners[:,[1,2,3]]
triangles = np.vstack([tri1,tri2])
Using matplotlib we can visualise the triangular mesh.
import matplotlib.pyplot as plt
fig,ax = plt.subplots()
ax.triplot(vertices[:,0],vertices[:,1],triangles)The Mountain bike park planned for Warburton has been extremely controversial with social and environmental concerns regularly voiced by critics. An Environm...
Triangular meshes can be used for representing surfaces in 3D, can be used for interpolation and other modelling. You can extract a triangular mesh using mar...
LoopStructural is the open source 3D geological modelling library that is the 3D modelling module of the Loop project. The code has been written in an objec...
We recently submitted another paper to the Loop3D special issue in Geoscientific Model Development. The paper is currently in discussion phase of the peer re...
The most recent version of LoopStructural addresses some minor bugs and adds a few small improvements for visualisation. The major changes are: Faults add...
Uncertainty in 3D geological models is challenging to simulate because the models used to represent geology are generally parameterised by the observations t...